 |
| source: http://store.kellymoorebag.com/products/libby |

Showing posts with label Tips and Tricks. Show all posts
Showing posts with label Tips and Tricks. Show all posts
Review: Kelly Moore Libby Bag
27 March 2014
Sometimes, the best way to explain something, is to explain it by actually showing it. So, today I made a video review of my favorite bag of all time to travel with. We travel pretty regularly since my entire family is roughly 2500 miles away. Alexander has become quite the flight pro. He is super good when we travel and we are so blessed that traveling with him is easy. Anyhoo...finding the perfect carry-on bag was something that took me a few years. After discovering Kelly Moore's bags, I decided to give the Libby a try and am relieved to finally have found my perfect travel bag.
No comments
Labels:
Tips and Tricks

Second Shooter Tips
03 November 2011
A couple weeks ago, I posted some tips on finding second shooter wedding jobs, and today I'm going to talk about some second shooter etiquette.

I really am big on etiquette. I actually have a few etiquette books on my
bookshelf at home, and teaching my 4 year manners is something I’ve been
working on since he’s been able to walk.
So, today I thought I’d share some wedding photography second shooter
etiquette.
- Understand
that you are representing the other photographer’s business. The couple did not hire you to capture
their wedding day the photographer did, whether the second shooter job is
paid or not.
- If
somebody asks you for a business card, never give them your card. Always give them the hired
photographer’s business card.
Again, you’ve been hired to work for the photographer.
- Each
photographer will work differently in how they want to handle the images
that you’ve captured. Some
photographers will want to take your cards home that night and that’s
okay.
- Always
allow the main photographer to post images before you do. I know it’s exciting, but DO NOT go post
images online for anybody to see until the main photographer says it’s
okay.
- Once
you get the okay to post images, make sure you mention the principal
photographer. In my experience, I
usually put something like, “by Laura Mae for Wedding Photographer
Photography”. Check with the
principal photographer on what they want you to do.
- Never
ever ever tag people in the photos or friend them on any social networking
site. You do not get to become
friends with the couple or wedding guests.
That privilege is given to the main photographer.
- Be
willing to do anything the principal photographer needs you to do. Do they need you to carry a step stool
for them so that they can get the photos they want to get? Do it.
Do they need you to carry their bags? Do it.
Do they need you to get a plate of food for them so they can do
something? Do it.
- Don’t
shoot over the main photographer’s shoulder. They don’t need the same shots they are
already getting. Sure, it would be
great to get that shot of the couple looking at the camera, but guess
what? You’re there to help the
photographer. Look for fresh angles
and different view points.
- Be on
time. The photographer is already
stressed enough. Don’t add to that
stress by being late. If something
happens that you can’t control, make sure you have the photographers cell
number handy to call them.
- If
something is frustrating you, put on a smile and move on. Don’t complain to anybody about
anything. A wedding is one of the
happiest days of a couple’s life and it’s your job to help the main
photographer add joy to that day.
Giving off a negative vibe is not good for business.
Tuesday Tips - Items to Capture Kids Attention
01 November 2011
Getting our kids to look at the camera so that we can take
their picture can be a challenge. Babies
and toddlers can be especially difficult, as they are so exploratory. Don’t get me wrong, I love the exploration
stage…it can just make for some difficult picture taking.


So, if they can help a photographer like me do her job, they can certainly help a parent too. That's why I'm sharing today's tip. Enjoy!
I’ve been looking for some cute camera buddies to grab kids
attention and just happened to stumble upon these.
Aren’t they adorable???


So, if they can help a photographer like me do her job, they can certainly help a parent too. That's why I'm sharing today's tip. Enjoy!
Breaking in to Wedding Photography by being a Second Shooter
14 October 2011
This weekend, I have the privilege of second shooting a
wedding with another local photographer.
I’ll share some of those photos some other day on the blog. Today, I thought I’d share some tips on
second shooting for anybody that is interested in doing this.
How do you find second shooter opportunities? What if you don’t have any experience and
have never been anything other than a guest at a wedding? Will anybody be willing to give you a
shot? These were all questions I had
less than 6 months ago when I decided I wanted to capture a couples’ love on
their wedding day. Getting experience in
how the wedding day works as a photographer was something I felt was extremely
important. It’s scary having the responsibility
of photographing the wedding day. Being
a second shooter gives you the ability to be a part of the photography on the
wedding day without all the pressure.
I found my first second shooter opportunity on OSP. OSP (Open Source Photo) is a free forum for
photographers and people can post second shooter opportunities that they have. The great thing about OSP
is that it’s a community of photographers that encourage each other, share
information, and are willing to help another photographer out.
One of the questions I wondered before joining this
community was, “will other photographers even give you a shot when you’ll end
up being their competition?” Well,
somebody did give me a shot and I am so grateful. There’s a change happening in the photography
community. Photographers are more
willing to share information than they were 10 years ago. They are also beginning to realize that each
client needs to find the right photographer for their day. I might not be the right fit for a couple and
that’s okay. Each couple deserves to
find their “perfect match” photographer.
So, where else can you find second shooter
opportunities? I’ve actually found my
last two on Craigslist. You can also
network with other photographers or call a photographer in your area and ask if
you can take them for coffee to chat with them.
To those of you trying to break in to the wedding
photography world but don’t know where to start; Good luck. Being a second shooter is a great place to
start and I hope you succeed. Next week
I’ll share some second shooter etiquette.
What to Wear to Your Fall Family Photo Shoot
26 September 2011
I noticed this weekend that the leaves are starting to change. Yes, I know it's officially fall, but it just happened so quickly! That being said, fall family photo sessions are right around the corner. Does anybody else find it difficult to dress the family for a photo session? You don't want to be too matchy matchy, but you want to look coordinated and cute. How about some help from a photographer?

This is a set I made on www.polyvore.com. If you click on the picture, it should bring up all the details on where to buy. Polyvore is a great site to pull together inspiration.
My tips for you?
This is a set I made on www.polyvore.com. If you click on the picture, it should bring up all the details on where to buy. Polyvore is a great site to pull together inspiration.
My tips for you?
- Dress in what makes you feel beautiful and comfortable at the same time.
- Don't dress too matchy matchy. Pull colors from each other's outfits to coordinate
- Dress for the season and the weather.
School Photos - My Baby's First Day of School
07 September 2011
My baby starts school today. How is he already going to school? I know it’s not required school, it’s pre-kindergarten, but still. Today is bittersweet for me. I am so unbelievably excited for him, but a little sad that he's become such a big boy. He is going to love school. I have never met such a social child. The kid craves company and loves making new friends. He’s been asking for over a year if he can become a big boy and go to school.
Every parent wants to get a picture of their children on their first day of school. Well, here are some ideas:


After we made him give us hugs (he was so ready to just have us leave), we said our goodbyes and he ran off to play. Bub, I am so proud of you and can't believe you've gotten so big already.
Every parent wants to get a picture of their children on their first day of school. Well, here are some ideas:
- Get the detail shots...the shoes lined up or the backpacks filled up and sitting by the door
- Get details of your child getting ready, maybe perfecting their hair, or tying their shoes
- Print out a sign with your child's grade for him/her to hold. Take this same pic every year
- Take a picture of your child's back as they get on the school bus.


After we made him give us hugs (he was so ready to just have us leave), we said our goodbyes and he ran off to play. Bub, I am so proud of you and can't believe you've gotten so big already.
Summer Fun at the County Fair
31 August 2011
Who doesn’t love going to the county fair? I know for me, the fair makes me feel like a kid again. It’s good family fun with lots of shared memories. The fair for us is more of a family tradition. I know most people go to the fair, but for me, I want to take Alexander because of the all the happy memories I had from the fair as a kid…the tradition of it all.


Though we’ve taken Alexander to the fair before, this year was really the first year he could ride on more than just the carousal. He had such a blast. His favorite ride was a jet-ski ride that bumped him around and I just love his face on the swing.

What do you think of when you think of the fair? I think of cotton candy, bright colors, lots of lights and farm animals. I think of smiles and sticky fingers, wind in my face and sunny days. So the question becomes how do we capture these moments? Well, first and foremost, Alexander rides the carousal every.single.year. We always capture that tradition.

The great thing about the carousal is that it portrays the quintessential elements of the fair. It also is colorful and has lots of lights on it.
I didn’t really focus on photography at the fair this year and capturing cool photos, but it would have been cool to get a picture of somebody swirling cotton candy, or Alexander taking his first bite and licking his fingers. By the time we got the cotton candy, we were ready to go. I was so excited for him since it was his first time eating cotton candy, but he decided he didn’t like it. We got in the car and he passed out!
Oh well, the most important thing is that I got to capture his excitement and happiness. That’s what really matters anyway.

See what I mean. This picture isn’t really anything special. What makes it special to me is that I can see his awe in and love for horses. Is it going to win a competition (not that my intention in photography is to win anything…just making a point)? No. Is it going to bring back memories for me and Alexander? Yes. This is what it means to just capture the moment.
Taking Better Photos Day 9 - Editing Your Photos
12 July 2011
Today is the last post of this series. Whew...I'm tired :)
So, you're capturing all these moments...now what? If you're anything like me, your photos just get dumped into your computer and maybe make it to Facebook. I am notoriously guilty for taking photo after photo and never developing them. Well, I need to fix this and get some updated photos on my walls. In order to do that, I want them to look as good as possible. In comes editing.
First things first. The best way to get great photos is to do your best to take a good photo straight out of camera (sooc). I'm of the mindset that editing my photos is more of a digital darkroom than doing crazy in Photoshop. Getting a good shot sooc saves time in the editing or post processing stage. So, first I'm going to explain what I do to edit a photo and then I'll tell you about some other options.
I do have the full version of Photoshop, but don't use it for my photos. I use a Photoshop program called Lightroom, and I absolutely lurve it! If your going to invest in a program, this is my favorite. The nice thing about Lightroom is that if you have a bunch of photos that you plan on editing with the same settings, you select them all and sync them. That way you're not having to edit each and every photo.
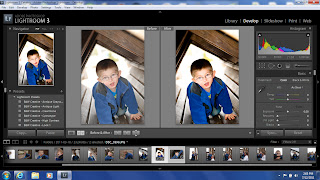
Here's an example of what Lightroom looks like. The before photo is my straight out of camera (sooc) photo. You can manually make all kinds of changes if you want complete control, or you can use what are called presets. In this example, the photo seemed a little dull. All I did was use the direct positive preset and then clicked on auto tone. That's it. That's all I did for post process on this photo and look at the difference.
If you choose Photoshop, that program has what are called actions, which are their version of presets. Google's Picasa has all kinds of editing options. Flickr, Shutterfly, Snapfish...they all have options. You don't have to invest money into a program. I know of many people that do their edits right in Picasa for web uploads.
Today's moral is that post processing can enhance the amazing photo that you've already taken if you don't go overboard. Keep it simple and enjoy what YOU captured.
Thanks for following along with this series. I hope it was helpful!
So, you're capturing all these moments...now what? If you're anything like me, your photos just get dumped into your computer and maybe make it to Facebook. I am notoriously guilty for taking photo after photo and never developing them. Well, I need to fix this and get some updated photos on my walls. In order to do that, I want them to look as good as possible. In comes editing.
First things first. The best way to get great photos is to do your best to take a good photo straight out of camera (sooc). I'm of the mindset that editing my photos is more of a digital darkroom than doing crazy in Photoshop. Getting a good shot sooc saves time in the editing or post processing stage. So, first I'm going to explain what I do to edit a photo and then I'll tell you about some other options.
I do have the full version of Photoshop, but don't use it for my photos. I use a Photoshop program called Lightroom, and I absolutely lurve it! If your going to invest in a program, this is my favorite. The nice thing about Lightroom is that if you have a bunch of photos that you plan on editing with the same settings, you select them all and sync them. That way you're not having to edit each and every photo.

Here's an example of what Lightroom looks like. The before photo is my straight out of camera (sooc) photo. You can manually make all kinds of changes if you want complete control, or you can use what are called presets. In this example, the photo seemed a little dull. All I did was use the direct positive preset and then clicked on auto tone. That's it. That's all I did for post process on this photo and look at the difference.
If you choose Photoshop, that program has what are called actions, which are their version of presets. Google's Picasa has all kinds of editing options. Flickr, Shutterfly, Snapfish...they all have options. You don't have to invest money into a program. I know of many people that do their edits right in Picasa for web uploads.
Today's moral is that post processing can enhance the amazing photo that you've already taken if you don't go overboard. Keep it simple and enjoy what YOU captured.
Thanks for following along with this series. I hope it was helpful!
Taking Better Photos Day 8 - Metering & Bringing it all Together
11 July 2011
I hope everybody had a FANTASTIC weekend! It was busy, but great for us. I had a newborn shoot and engagement shoot over the weekend that I'll post about soon. Today, we're going to talk more about our cameras. So, I've told you about Shutter Speed, Aperture and ISO, but how the heck do you make it all work together to have complete control over your camera? It's surprisingly easy once you understand how each of those 3 things work, and our cameras help. Here's the breakdown:
1. Switch your camera into manual mode
2. Choose your ISO based on how bright or dim your location is.
3. Choose your Aperture. Do you want a really blurry background? Go for a low number. Do you want everything in focus? Go for a high number.
4. Here comes the "work". Your camera has something called an exposure meter. It looks something like this:

That's it. It might seem confusing at first, but once you find your light meter and start adjusting your shutter speed, you'll get it before you know it. Guess what? You now know the basics of shooting in manual.
Tomorrow is all about Photoshop and post processing programs to help enhance your photos.
1. Switch your camera into manual mode
2. Choose your ISO based on how bright or dim your location is.
3. Choose your Aperture. Do you want a really blurry background? Go for a low number. Do you want everything in focus? Go for a high number.
4. Here comes the "work". Your camera has something called an exposure meter. It looks something like this:
image courtesy of www.photography.about.com
This meter is what's going to tell you what shutter speed to use based on the ISO and aperture that you chose. If your LCD is displaying your settings, your light meter will show there. On my camera, I look through my viewfinder and hold my shutter release button down 1/2 way. This will bring up my exposure meter. Your meter will show if your picture is going to be too dark (underexposed), or too light (overexposed) by either being on the - side or the + side. If your meter is on the - side, dial your shutter speed down to a slower speed until your meter is 0. If your meter is on the + side, dial your shutter speed up until your meter is 0.That's it. It might seem confusing at first, but once you find your light meter and start adjusting your shutter speed, you'll get it before you know it. Guess what? You now know the basics of shooting in manual.
Tomorrow is all about Photoshop and post processing programs to help enhance your photos.
Taking Better Photos Day 7 - ISO
06 July 2011
As a child, I can remember in detail my little camera that used 110 film. I remember upgrading to a 35mm camera and buying film for it. I remember having to worry about film speed. If we were going to the races I needed at least 800. Otherwise, I stuck with 200. Okay, maybe I wanted to use 400 sometimes. Those were my go to speeds as a kid.
What does this have to do with ISO? Well, the speed of film is the measure of the film's sensitivity to light and ISO is the digital version of film speed. ISO tells your camera HOW sensitive it needs to be to light. ISO ranges from 100 to the thousands depending on your camera.
My best tip for you is to keep your ISO as low as possible. ISO is a great tool, but it has a drawback. The higher an ISO you use, the more grainy your photo. Grain in a photo is known as "noise" in photography terms. If your outside on a sunny day, keep your ISO at 100. When your inside a dim room, your ISO will need to be higher.
Tomorrow I'm going to go over pulling together the triangle...shutter speed, aperture and ISO. You'll be shooting in manual and having complete control over your camera in no time.
What does this have to do with ISO? Well, the speed of film is the measure of the film's sensitivity to light and ISO is the digital version of film speed. ISO tells your camera HOW sensitive it needs to be to light. ISO ranges from 100 to the thousands depending on your camera.
My best tip for you is to keep your ISO as low as possible. ISO is a great tool, but it has a drawback. The higher an ISO you use, the more grainy your photo. Grain in a photo is known as "noise" in photography terms. If your outside on a sunny day, keep your ISO at 100. When your inside a dim room, your ISO will need to be higher.
Tomorrow I'm going to go over pulling together the triangle...shutter speed, aperture and ISO. You'll be shooting in manual and having complete control over your camera in no time.
Taking Better Photos Day 6 - Aperture
05 July 2011
How was every body's 4th of July? I hope y'all got some great fireworks pictures. We celebrated in Avon Lake and watched a good fireworks show. Sunset was beautiful.

Oh how I miss the water. Anyway...I hope you took out your cameras and caught lots of memories over the weekend. Alexander got to go on a slip and slide, which he completely loved.

How did it work out to slow your shutter speed for fireworks shots? It takes some getting used to. I didn't get a single shot last year that I liked and we were so close to the action this year that I only had a few keepers this year.

Today I'm going to talk about the second part of the triangle, which is aperture. We know that shutter is how slow or fast your camera is taking a picture, and that it also means a brighter photo with a slow speed and a dimmer photo with a fast speed. Well, aperture does a couple of things too.

When your aperture is wide open, you're letting more light in.

When your aperture is "closed", you're letting less light in.

To get a blurry background, you need your lens wide open.

So how do you change your aperture?
Point and Shoot users: Portrait mode is your aperture friend. Portrait mode tells your camera to use an aperture that will create slightly more blur than auto mode.

Oh how I miss the water. Anyway...I hope you took out your cameras and caught lots of memories over the weekend. Alexander got to go on a slip and slide, which he completely loved.

How did it work out to slow your shutter speed for fireworks shots? It takes some getting used to. I didn't get a single shot last year that I liked and we were so close to the action this year that I only had a few keepers this year.

Today I'm going to talk about the second part of the triangle, which is aperture. We know that shutter is how slow or fast your camera is taking a picture, and that it also means a brighter photo with a slow speed and a dimmer photo with a fast speed. Well, aperture does a couple of things too.
- Like shutter speed, aperture controls how much light is getting into your camera as well. Think of aperture like the pupil in your eye. When you're out in the bright sun, your pupil constricts, or gets small, because your eye doesn't need as much light to see. When you're inside a dim room, your pupil dilates, or gets larger, in order to let more light in so you can see better. Your camera aperture is how open your lens is or how closed it is. Oh how I tried to find a good graphic to explain this. Oh well. Don't mind the bad photos from my iPhone. They get the point across.

When your aperture is wide open, you're letting more light in.

When your aperture is "closed", you're letting less light in.
- The other aspect of aperture has to do with how blurry your background is. This is otherwise known as Depth of Field (DoF) in photography language, but really it's all about blur.

To get a blurry background, you need your lens wide open.

This picture has a small aperture and you can see everything in the background. Blurry backgrounds really change your photos because it allows the focus to be on your subject. In this photo, I'm much more distracted by the people swimming in the background, but in the previous photo you can't even see them.
So how do you change your aperture?
Point and Shoot users: Portrait mode is your aperture friend. Portrait mode tells your camera to use an aperture that will create slightly more blur than auto mode.
SLR users: Aperture is referred to as f-stops on your camera. Look at the numbers on your lens. Do you see numbers maybe ranging from f/4.5-5.6, going all the way up to 22? These are your aperture numbers. the lower numbers are the widest your aperture will open. The 22 is the pin like aperture letting in less light and blur. Switch your camera to Aperture Priority mode. This mode allows you to choose your aperture and your camera chooses everything else for you. Do you want blurry backgrounds? Stick with lower f-stop number (1.8, 4.5, 5.6)...turn the dial as low as your camera will allow. Do you want everything in focus? Choose f/22...turn the dial as high as your camera will allow.
Tomorrow is all about ISO. Whew...this post was long.
Taking Better Photos Day 5 - Shutter Speed
01 July 2011
Does anybody else ever feel like they’re not getting the picture fast enough? I know with Alexander, I used to feel that I was massively missing out because he’d do something, I’d try to take a picture, and he’d already be gone by the time the camera actually took the picture. Point and shoots are kind of notorious for this.
So what is this elusive shutter speed? In a nutshell, it’s how slow or fast your camera is taking a picture. Think of shutter speed like blinking your eye. When your eye is open, your shutter is open. The speed of your shutter opening and closing affects a couple of things.

For example, this picture was taken with a slow shutter speed of 4/100 of a second. If I could have done it freehand, I would have done 1 second instead, but using a slow shutter speed also has a hitch. The slower the speed, the more blur you get. In a picture of a waterfall, you want blur, in a family group shot…not so much.

This picture was taken with a shutter speed of 1/160 of a second. See the lack of cotton candy effect? That’s because a faster shutter speed freezes action better.
Point and shoot users: Want to get action shots or shots that freeze action? Switch into sports mode. Some cameras even have a fireworks mode, which will slow everything down. If not, try night mode but realize that because of the slower shutter speed, you might get blur if you don’t set your camera on something like a tripod. Some point and shoot cameras have a manual mode.
SLR users: Now’s the time to play with shutter priority mode. This is a great starting point because everything except the shutter speed is still automatic. Play with shutter speed.
Some of this has to do with auto-focus, and some of it with shutter speed. Something that helps me immensely is to hold the shutter release button (the button you push to take your picture) half way down. Doing this will allow you camera to focus on your subject, that way you’re ready when you want to snap your picture. The only hitch with this plan is that you need to somewhat anticipate the moment. Luckily, we usually know when we want to take a picture since we have our camera’s in our hands J
So what is this elusive shutter speed? In a nutshell, it’s how slow or fast your camera is taking a picture. Think of shutter speed like blinking your eye. When your eye is open, your shutter is open. The speed of your shutter opening and closing affects a couple of things.
- You know how you see photos of waterfalls where the water looks like cotton candy? That’s achieved by using a slow shutter speed, or by keeping the shutter open for a longer period of time. Or, you see photos of race cars going over 100mph frozen in action? That’s achieved by using a fast shutter speed, or by having the shutter open and close quickly.

For example, this picture was taken with a slow shutter speed of 4/100 of a second. If I could have done it freehand, I would have done 1 second instead, but using a slow shutter speed also has a hitch. The slower the speed, the more blur you get. In a picture of a waterfall, you want blur, in a family group shot…not so much.

This picture was taken with a shutter speed of 1/160 of a second. See the lack of cotton candy effect? That’s because a faster shutter speed freezes action better.
- The other aspect of shutter speed has to do with light. The slower your shutter speed, or the longer you keep your shutter open, the more light you’re going to get in your photo. The faster your shutter speed, the less light. Say you’re taking shots at night or in a dim room, you’re going to want a slower shutter speed. Say you’re out in the bright sun, you can use a fast shutter speed. Again, keep in mind that a slower shutter speed allows more room for blur in your photos.
Point and shoot users: Want to get action shots or shots that freeze action? Switch into sports mode. Some cameras even have a fireworks mode, which will slow everything down. If not, try night mode but realize that because of the slower shutter speed, you might get blur if you don’t set your camera on something like a tripod. Some point and shoot cameras have a manual mode.
SLR users: Now’s the time to play with shutter priority mode. This is a great starting point because everything except the shutter speed is still automatic. Play with shutter speed.
Now for fireworks. Logically speaking, I would think that because fireworks can be such a quick blast you would need a fast shutter speed, but the opposite is true. A really slow shutter speed will help you get those picturesque fireworks photos. Try it this weekend during all those Independence Day festivities. I’ll be back on Tuesday to talk about the second aspect of that triangle, aperture.
Taking Better Photos Day 4 - Camera Settings
30 June 2011
You know what really annoys me? When photographers talk about the triangle but fail to explain what the heck it is. Don’t worry, I’ll explain what that means soon. It took me a LONG time to learn how to shoot in manual mode. You see, our camera’s have all these shooting modes on them. Point and shoots have a menu where you can choose portrait mode, landscape mode, candlelight mode, action mode, etc. SLR’s have Program Priority, Shutter Priority, Aperture Priority, Manual Mode, and a few like the point and shoots. Ack! Even better, I don’t speak user manual and the language puts me to sleep. So, I learned through a lot of research and a lot of trial and error about what all of these mean.

Today, I’m just going to give a quick explanation of “the triangle”. It consists of 3 things (obviously, since a triangle has 3 sides).
- Shutter Speed
- Aperture
- ISO
I do have another tip regarding composition today. Framing is another technique that photographers like to use. Is there anything around you that could provide a natural frame for your subject? Alexander and I went on a picnic yesterday in Olmsted Falls

Taking Better Photos Day 3 - Angles
29 June 2011
My next secret is called camera tilt. It’s amazing the creative difference it can make in a photo if you literally just tilt your camera to the side a little (not a lot) when taking your picture.

Is anybody noticing a theme in my pictures? Get down to your subject’s level. Say you’re taking a picture of a baby. Don’t just stand and take pictures looking down on them. Get on the floor. It’s amazing the difference this will make.
Short and sweet for today. Tomorrow we’re going to dive into the technical stuff. Don’t worry…I promise I won’t put you to sleep J

Is anybody noticing a theme in my pictures? Get down to your subject’s level. Say you’re taking a picture of a baby. Don’t just stand and take pictures looking down on them. Get on the floor. It’s amazing the difference this will make.
Short and sweet for today. Tomorrow we’re going to dive into the technical stuff. Don’t worry…I promise I won’t put you to sleep J
Taking Better Photos Day 2 - Composition
28 June 2011
Today’s lesson is seriously one of the fastest and easiest ways to completely change your photos. It’s called composition. Composition is just the way in which something is arranged in your picture. From a photography standpoint, what you see on your LCD screen or through your camera is called a frame. How you arrange what you see in your frame is your composition.
 The secret in composition is to not completely center your subject. Put their face in the top third and look at the difference. Place their nose on one of the intersecting lines.
Here's another great tip. Get in close! Too much background takes the focus away from your subject. It can be distracting and most of the time isn't needed to tell a story with your photo. Of course, that depends on where you are. If you're taking pictures with a picturesque background, okay, I get it. If your taking pictures and there's a mess of laundry in the background or toys all the over the place, not so much.
Look at the difference between the pictures below. Out of the next two pictures, which is more appealing to your eye?


I am a complete design junkie. Interior design and decorating are something I love. In decorating, there is a secret to making things more appealing to the eye…groups of 3 (or odd numbers in general). Well, in photography, there is something called the thirds principle. Think of the below picture as our camera frame. If you’re looking through your viewfinder (you know, the thing you put your eye up to in order to see into the camera) or your LCD screen, where is your subject placed? If you’re taking a picture of a person, is the person’s face directly in the middle? Is it off to the side a little?

Here's another great tip. Get in close! Too much background takes the focus away from your subject. It can be distracting and most of the time isn't needed to tell a story with your photo. Of course, that depends on where you are. If you're taking pictures with a picturesque background, okay, I get it. If your taking pictures and there's a mess of laundry in the background or toys all the over the place, not so much.
Look at the difference between the pictures below. Out of the next two pictures, which is more appealing to your eye?


Play with composition. Don’t be afraid place your subject somewhere else in the frame. It’s digital and you’re not wasting film; so if you decide you don’t like it, it’s no big deal.
Taking Better Photos - Day 1
27 June 2011
Now that summer has officially arrived and 4th of July celebrations are quickly approaching, there couldn’t be a better time to take out our cameras and capture some good times.

Scott and I went out to Geneva-on-the-Lake this weekend and celebrated our anniversary at the Lake Erie Wine Festival. Our 5th anniversary celebration is definitely one I'll remember and I'm glad we got a picture. What do you want to remember?
As a photographer, I am often asked by friends about “how to take good pictures”. This question kind of breaks my heart. Photography is something I have worked hard at understanding and I know what it’s like to feel that the pictures I’m taking just aren’t up to par. Through my journey of learning photography I have learned something much more important. You could know everything there is to know about your camera, but if the picture doesn’t speak to you, you’re still not going to feel that your pictures are good enough. I still don’t know everything and I don’t think I ever will. I’m okay with that because it allows me room to grow. Sure, the technical aspect helps, but photography is about emotion. It’s much more important that the picture invoke emotion in you than it is to capture a perfect technically accurate photo.
However, since I’ve been there, I totally relate and it’s been on my heart to educate a little bit. I remember as a new mom what it was like to feel as if I wasn’t going to do a good enough job at capturing Alexander. That’s what my driving force was in learning photography. I wanted and still want to be able to have Alexander look back on family photos and feel like he was going back in time to that moment. So, I’m going to spend some time blogging about camera know how.
From a camera standpoint, the price of DSLR’s these day’s makes buying an awesome camera easily attainable to the non professional. In my eyes, that’s great news. The bad news is that most people only know auto mode, as that’s what our point and shoots gave us. Point and shoots also offer some nice hidden gems. We’ve bought these wonderful cameras, but don’t know what power they possess. This must be fixed.
First up, for this lesson I want everybody to forget about technical know how. Just enjoy taking pictures. Enjoy watching the story unfold before your eyes. Enjoy being in the moment and capturing it. Be it your kids, your pets, the weather, nature, Independence Day weekend with your friends and family…whatever it is, just capture it. Next week we’ll get into the know how. For now, just see those sweet moments and take your picture.

Subscribe to:
Posts (Atom)